Thursday, May 1, 2008

Sexy Down


I came home yesterday to find that one of the sexy shrimps had committed suicide. I'm not sure how it happened but I found her dried up by the edge of the tank. So my sexy trio is now a duo and I don't think I'll be adding more anytime soon. R.I.P. little sexy.

Tuesday, April 29, 2008

News


It appears that I've somehow completely neglected this blog. The Nano Reef Project is still going strong with many new updates including a DIY refugium that I'll do a thorough write-up on as well as some new and exciting corals in the tank. Additionally, I helped a friend start up a 9-gallon tank back in mid-March that is now doing well with some points of interest all its own. Stay tuned!

Monday, February 11, 2008

I'm Bringing Sexy Back

Sexy shrimps that is. I finally got my hands on a trio of sexy shrimps by making a special order through my favorite LFS. Sexy shrimp (Thor amboinensis) are commensal shrimps that are found in the tentacles of anemones and various coral polyps. This fascinating shrimp exhibits an unusual trait of swaying its abdomen back and forth, hence the name Sexy shrimp. Growing to a maximum size of 1.5 inches, they are tiny which is why most aquarium shops don’t carry them regularly and are only available by special order.


I made a special order last weekend and finally got my shrimps over the weekend and what a sight to behold. Apparently they fare better in odd numbers so I got three, which is a pretty good number as far as odd numbers go.


Here they are huddled together in the bag from the store.


Sexy shrimps—like all shrimps in general—are highly sensitive to changes in pH and salinity so a slow drip acclimation process is required. I used a simple drip acclimation kit I got from Drs. Foster and Smith a while back but this can also be easily rigged together using airline tubing and a check valve.


I hung the hard u-shaped end inside the tank…


…with the opposite end with the check valve dangling over the bag which I secured inside my graduated bucket.


After starting a siphon I adjusted the flow rate to about four drops per second for the next two hours.


I topped off the tank with saltwater as it evaporated while disposing some of the excess water from the bag. After an hour, I began recycling the water back into the tank as it was mostly tank water at this point.


I used a small glass container to transfer them from the bag to the tank to allow me to give them a close inspection.


Once they were in the tank they began finding their own niches.


It wasn’t too long before they started gyrating their bottoms, which they are famous for.


The first twenty-four hours were critical but they all successfully passed. In fact one of them has already molted. I feed them shrimp pellets every other day and frozen brine shrimp once a week before my water change to minimize the mess. I also plan to give them some variety so I’ll be including Cyclop-eeze and mysis shrimps in their diet.


I’ll make sure to capture their sexy dance on video to post up here soon. 

Saturday, February 9, 2008

Let there be light! Or not.

My tank has finally undergone its first major upgrade. I was determined to keep my tank with the stock light right from the start but lately have been entertaining the idea of possibly upgrading the light. Aesthetics aside, I also wanted to see if my corals can thrive even better and grow as oppose to simply surviving which it has successfully done with the stock lamp.


I decided to go with a Current Dual Satellite fixture ($75 at Big Al’s Online), which upgrades my light from 9-watts to 36-watts. The hood comes with dual daylight tubes (10,000k and 6,700k), dual actinic tubes (420nm and 460nm) and an LED lunar light, which altogether provides a complete 24-hour light cycle.


Package shot:


Right out of the box.


Testing the dual daylights.


Testing the dual actinics.


Daylights and actinics on.


Testing the lunar LED.


Installing mounting brackets.


The light fixture has three separate plugs for each light making it possible to plug into switch timers. So I decided to get a Digital Power Center ($35 at Petsmart) to automate my lighting.


To my disappointment, the power strip only comes with two daytime outlets and two nighttime outlets that can’t be both on at the same time. I wanted to be able to switch the actinics on before the daylight fixtures in the morning to simulate a dawn effect, and have it turn off last at night to simulate a dusk effect. I also couldn’t set the lunar light individually to come on at night so I had it plugged into my old timer switch on a different power strip.


I programmed the timer and tested it. But because I installed it at night, I wasn’t able to run the lights on as my photoperiod schedule is from 10 a.m. to 10 p.m. This was on Monday. On Tuesday I didn’t make it home until past ten so I only caught the tank with the lunar light on. It wasn’t until Wednesday that I was able to come home on time only to find all the lights off! The Digital Power Center had apparently failed! I checked all the settings and everything was right but somehow it did not turn on like it was suppose to.


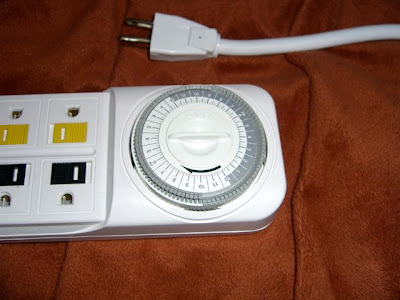
So I made a mad dash to Petsmart to return it and pick up a different power strip. I got the Aqualight Power Center ($45) and while it has analog controls, it also comes with better features.


It has specific outlets for actinics, daylights and lunar lights. It has two separate timers with 15-minute intervals so it could also be used as a wave-maker. The actinic and lunar outlets are set to the same timer so when the actinics are on, the lunar lights are off and vice versa.


The daylight outlets are set to its own timer independent from the other two.


I ran a late photoperiod from around 7 p.m. until midnight to make up for the total darkness in the past couple of days. As for the new lights, the results are incredible. I had no idea my tank could look this good.


Top-down shot:


Isometric shot:


Underside shot:


Back shot showing all three wires:


Actinics only:


The new lights not only brought out better coloring in my corals but they also promoted full polyp extension in all the corals. In short, the corals look much happier.


View from the left:


View from the right:


Close-up of the button polyps:


Close-up shot of the daisy polyps:


Zoanthid garden. The small group of daisy polyps on the left broke off from the main colony while I was trying to rearrange the rock.


Green star polyps now with full polyp extension.


The night scene is markedly different with the lunar light on.


Saturday, February 2, 2008

Three Months Later: Big Update

This post is the beginning of a series of updates to make up for the slow progress. While I finally defeated my bout of cyanobacteria and my purple mushroom has split and produced another cap, my orange-green zoas were nearly decimated.

The lush dense colony on the branching coral is no more, save a few polyps here and there. At first I blamed the hermit crabs for constantly climbing and perching on top of the polyps. But then I started noticing a very shy and mysterious crab that’s found a hole in one of my live rocks. Round beige body mottled with brown, fuzzy legs and black-tipped claws. So far it sounds like it could be some kind of xanthid crab, which is not reef safe as it’s known to prey on coral polyps and other invertebrates in the tank.

I’ve also been looking into acquiring more corals. This time I figured I should get something that would fill my tank up all at once as oppose to getting another random frag. I was willing to depart with the top rock in my tank in exchange for a rock with multiple corals. Coincidentally, this also happens to be the rock where the mystery crab has made its home.

After an afternoon of coral shopping with a friend, I finally found the perfect rock at Atlantis, the same place where I got my live rock. The rock is more or less the same size as the rock I’m willing to let go and is encrusted with four different types of polyps: daisy polyps (Clavularia spp.), green star polyps, button polyps (Palythoa spp.) and two or three varieties of zoanthids. For me, the diversity of coral polyps on this rock more than justifies the steep $119 price tag.  


I rushed home to drip acclimate the rock for an hour.


I placed the rock in the middle of the tank after it was acclimated. On the left are the various zoanthids with some polyps already open, in the middle are the button polyps, daisy polyps on the right and the purple patch in the back are the green star polyps.


Front shot taken right after it was placed in the tank so the polyps haven’t opened yet. I’m concerned about the green star polyps in the back being too close to the surface.

The water just barely covers the tip of the rock when filled all the way. This leaves the green star polyps vulnerable to being exposed out of the water with normal evaporation. Also, the orange ricordea is a bit too close to the button polyps which is preventing one of the polyps from fully extending. I will have to reposition the rock to find a good angle where the green star polyps are fully submerged and to make sure there’s ample space between the ricordea and the button polyps but I’m letting it alone for now to give them time to acclimate in their new environment.


More to come:

• Lighting upgrade

• Sexy shrimps

• DIY refugium

Sunday, January 13, 2008

Photo Updates

Progress is a little slow on the reef project but what it lacks in changes more than makes up for in stability. Parameters have been at a constant though I'm still battling the pesky patch of cyanobacteria. I still haven't been able to single out the source of my problem as my phosphate constantly tests at zero. I've been siphoning out the layers during my water change but to no avail. I may have to tweak my powerhead a little to redirect the flow more over to that side as high water flow usually prevents cyanobacteria from taking hold. A last resort would be to ditch the top rock completely (the only piece with the cyanobacteria) to free up some room for more corals.

Now on with the photo updates...


From the left:

From the right:

Top-down view:

Purple mushroom macro:

Orange and blue Ricordea yuma:

Orange and green zoanthids: